


2 Layered Stripe Kit Vinyl Decals Fits Jeep Gladiator JT 2020-Present
Black
$99.99
Sale price
$99.99
Regular price
Skip to product information


NEW
2 Layered Stripe Kit Vinyl Decals Fits Jeep Gladiator JT 2020-Present
Collectible Decals
$99.99
Sale price
$99.99
Regular price
Made in the USA
Premium 6-Year Vinyl
Veteran Owned
Free Shipping Over $59
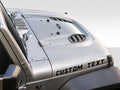
Introducing our 2 Colored Stripe Kit Vinyl Decals, the perfect aesthetic upgrade for your Jeep Gladiator JT (2020-Present). Designed with precision and passion, this decal set is engineered to enhance your Jeep's rugged charm and distinctive style. Each kit features two meticulously crafted layers, offering a dynamic and sophisticated striped pattern that runs seamlessly along the body of your Gladiator. Made from high-quality, durable vinyl, these decals resist the elements and retain their vivid colors, ensuring your Jeep stands out in any environment. They offer an instant style upgrade without permanent modification and are easy to apply and remove. Whether navigating urban streets or exploring off-road terrains, these vinyl decals add personality and flair to your Jeep Gladiator JT, making it unmistakably yours.
Product Details:
Crafted from premium Oracal 651 intermediate calendared vinyl, this vinyl transfer decal is designed for long-lasting outdoor durability and a clean, painted-on appearance once applied. Precision cut for crisp detail and smooth lines, each decal is made to order and includes professional-grade transfer tape for easier installation. Choose from 78 vibrant color options, including standard gloss finishes, matte Black and matte White, plus eye-catching metallic finishes like Silver Metallic, Rose Gold Metallic, Gold Metallic, and Copper Metallic to perfectly match your style.
Depending on the size and complexity of the decal, we use either RTape 4078 RLA or ORATAPE HT55 transfer tape to help ensure clean transfer and accurate application.
- Made from genuine Oracal 651 vinyl.
- Precision-cut vinyl transfer decal (not printed).
- 78 color options available.
- Matte options: Black & White.
- Metallic options available.
- Rated for long-term indoor and outdoor use.
- Water-resistant and UV-resistant.
- Includes professional transfer tape for installation.
- Designed for clean, smooth, flat surfaces.
- Made to order
Benefits:
Oracal 651 vinyl is known for its durability, vibrant color selection, and clean professional finish, making it a popular choice for vehicle graphics, windows, laptops, tumblers, and more. Unlike printed stickers, transfer decals have no background, giving the design a sleek, painted-on look that blends seamlessly with your surface. With strong adhesive performance and weather-resistant construction, these decals are built to handle sun, rain, and everyday use while maintaining their bold appearance over time.
Installation Instructions:
Required Tools:
Retractable razor blade, squeegee, tape measure or ruler, and a spray bottle filled with isopropyl alcohol.
Optional:
For easier positioning during installation, lightly mist both the application surface and adhesive side of the decal with water. This reduces the initial tack, allowing more flexibility during placement, but will increase drying time. Allow at least 10 minutes of drying time before checking adhesion and removing the transfer tape.
Surface Preparation:
All surfaces should be considered dirty and must be thoroughly cleaned before installation. Painted metal surfaces should be cleaned using an automotive detergent. Wipe the surface dry using a clean, lint-free cloth to ensure proper adhesion.
Step 1: Tape in Place
Position the decal and align it using a nearby horizontal line or reference point. Use a level if necessary to ensure the decal is straight and even. Once aligned, place masking tape on the corners to temporarily hold it in place. Apply a strip of masking tape across the top edge of the decal to create a hinge for easier application.
Step 2: Remove the Backing Paper
Carefully hinge the decal upward using the masking tape hinge. Slowly peel the backing paper away from one corner, working gradually across the decal until the backing is fully removed. Hold the decal taut and avoid allowing the adhesive side to touch the surface prematurely.
Step 3: Apply the Decal
Using a squeegee, begin at the center of the decal and work outward using firm, smooth strokes. Apply even pressure to push air outward and ensure proper adhesion to the surface. Continue working across the entire decal until all sections are securely applied. Go over the decal once more with the squeegee to ensure full contact.
Step 4: Remove Transfer Tape and Trim if Necessary
Slowly remove the transfer tape by pulling it back flat against the surface. Watch carefully to ensure the vinyl remains properly adhered during removal. If needed, use a retractable razor blade to carefully trim around door seams or edges and tuck excess vinyl inward for a clean finish.
Application Tip:
If small air bubbles appear, use the tip of an X-Acto knife or pin to gently release the trapped air. Smooth the vinyl down carefully using your finger or squeegee.
When will I get my order?
Every decal is made to order in the USA, using commercial-grade vinyl-cutting and finishing equipment for precise detail and professional quality. We use industry-trusted machines from Summa, Graphtec, and Mefu, while final preparation and quality control are carefully completed by hand.
Because each decal is custom-produced, please allow 1–7 business days for production before shipping. Once your order ships, tracking information will be sent automatically.
Outline Color
Complete your install kit